Manage Organizations
As an instance administrator, you have additional privileges compared to an organization administrator. You can not only manage existing organizations, but also create new ones, assign resources to them, and define global constraints.
Access: verified_user Admin Area > dashboard General > domain Organizations.
In instance administrator mode, additional options appear in the interface compared to a regular organization administrator.
Organization List
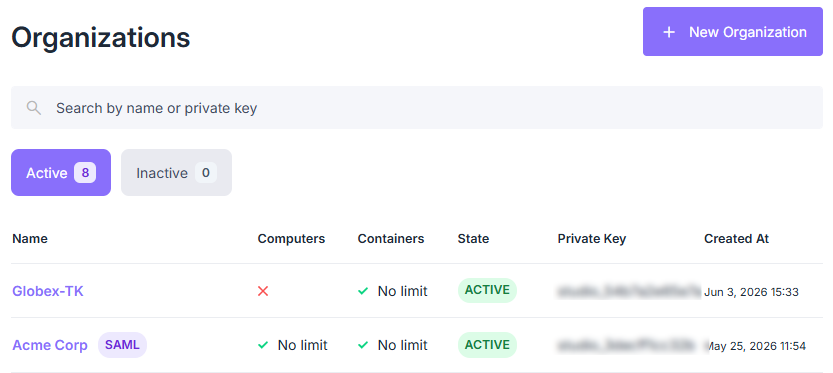
The Organizations page displays all organizations within the instance.
List of organizations
Each row contains the following key information:
Organization name
Computers: whether the feature is enabled for this organization
Containers: whether the feature is enabled, and its license limit (e.g. No limit)
State (active or inactive)
Private Key for associating with desktops and containers
Creation date
You can search organizations by name or private key, and filter the list to show only active or inactive organizations.
Overview
Selecting an organization from the list takes you to its Overview page — the same license and resource summary an organization administrator sees. See Overview for details on each field.
Creating an Organization
As an instance admin, you can create a new organization.
Navigate to verified_user Admin Area > dashboard General > domain Organizations, then click New Organization.
Fill in the form tabs (detailed below).
Click Create: the organization appears in the list, with its private key automatically generated to associate it with agents (computers, containers).
Organization Tab
Name: Full name of the organization.
Short Name: Unique short name, used to compose the organization’s custom login URL.
Icon (SVG): Optional custom icon displayed for the organization (SVG format only), with a live preview.
Connectors: Option to disable access to instance connectors on this organization’s login page.
Status: Sets the organization’s State: Active (immediately usable) or Inactive (suspended, with no access to resources).
Features Tab
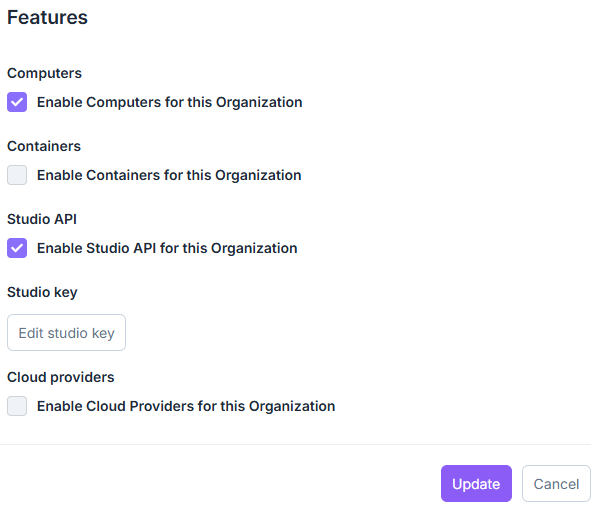
Features tab of the organization form.
Computers: enables remote desktop management for this organization.
Containers: enables container management for this organization.
Studio API: allows the use of the Studio API for this organization — see Enable the Studio API for details.
Studio Key: click Edit studio key to manually change the organization’s Studio Key value.
Cloud Providers: allows linking cloud providers.
Warning
Changing the studio key can break the organization’s integrations (signal server, Wake-on-LAN, cloud) until agents and clients are updated with the new value. Expected format: studio_ followed by 12 alphanumeric characters (e.g. studio_a1b2c3d4e5f6).
Licenses Tab
Remote Desktop: check Limit remote desktop licenses to set a Remote Desktop Limit.
Containers: check Limit container licenses to set a Containers Limit.
Containers Tab
You can define placement rules (constraints) for containers, which determine on which cluster nodes containers will run based on the labels attached to those nodes. For details on how this works (key, operator, value) and a practical example, see Container Placement Constraints.
Important
These constraints will apply to all container profiles of the organization. If constraints are set here, they can no longer be modified in container profiles.
Enable the Studio API
This option is only available if the Studio API has first been enabled at the instance level by an infrastructure administrator — see Enable the Studio API.
To enable the Studio API on an existing organization:
Go to verified_user Admin Area > dashboard General > domain Organizations, select the organization, then admin_panel_settings Administration > Edit.
In the Features tab, check Enable Studio API for this Organization.
Click Update.
Once enabled for the organization, the organization administrator can generate API keys from the API tab in organization settings — see API Keys.
Managing an Existing Organization
After creation, navigate to verified_user Admin Area > dashboard General > domain Organizations, select the organization, then admin_panel_settings Administration > Edit. From there you can adjust quotas at any time (Licenses tab) or temporarily deactivate the organization (Organization tab, Status field).
For internal management of the organization (users, container profiles, collections, etc.), see Manage your Organization.
Export and Import an Organization
As an instance administrator, you can export an entire organization to a JSON file and import it back — useful for migrating an organization between environments (e.g. public to private cloud).
Note
This feature is reserved for instance administrators and intended for occasional use (e.g. environment migration) rather than everyday organization management.
Exporting an Organization
Navigate to verified_user Admin Area > dashboard General > domain Organizations and select the target organization.
Go to the admin_panel_settings Administration tab, then click Edit.
Click Export.
The exported file includes:
Users, their organization membership and roles
Workstations, groups and group settings
Access rights, schedules and remote experiences
SSO / identity connectors
Session and authentication history
Include history is checked by default; uncheck it to produce a lighter file without the activity history.
Warning
This file contains sensitive data (Studio Key, SSO secrets, password hashes). Store and transfer it securely.
Importing an Organization
Navigate to verified_user Admin Area > dashboard General > domain Organizations.
Click Import and select the exported file.
Regenerate the studio key: unchecked by default, so the original Studio Key is kept. Enable it to generate a brand-new key, as for a new organization.
Include history: checked by default; uncheck it to skip the activity history and import faster.