Sensitivity Rules
Define which commands and URLs are sensitive, and with what severity, so that the alerts on recordings fit the usage of each type of user.
Access: verified_user Admin Area > shield Network & Security > videocam Session Recordings > policy Sensitivity rules.
A sensitivity rule detects a command or a URL in the logs of a session and gives it a severity. Rules are grouped into templates, which you assign to container profiles or to organizations. What is normal for a Linux administrator (sudo, systemctl restart) can be an alert for an external contractor: a different template for each type of user avoids false alerts.
Each session uses a single template: the template of its container profile if it has one, otherwise the template of its organization, otherwise Default.
Note
The selected template replaces the others: the rules of several templates are not combined. A template with no rule classifies every line as Info: it triggers no alert.
Note
Rules detect sensitive actions but do not block them. Only instance administrators can change templates and rules. Each change is recorded in the security logs, with the author, the date, the action (for example admin.recording.sensitivity.rule.created), and the target.
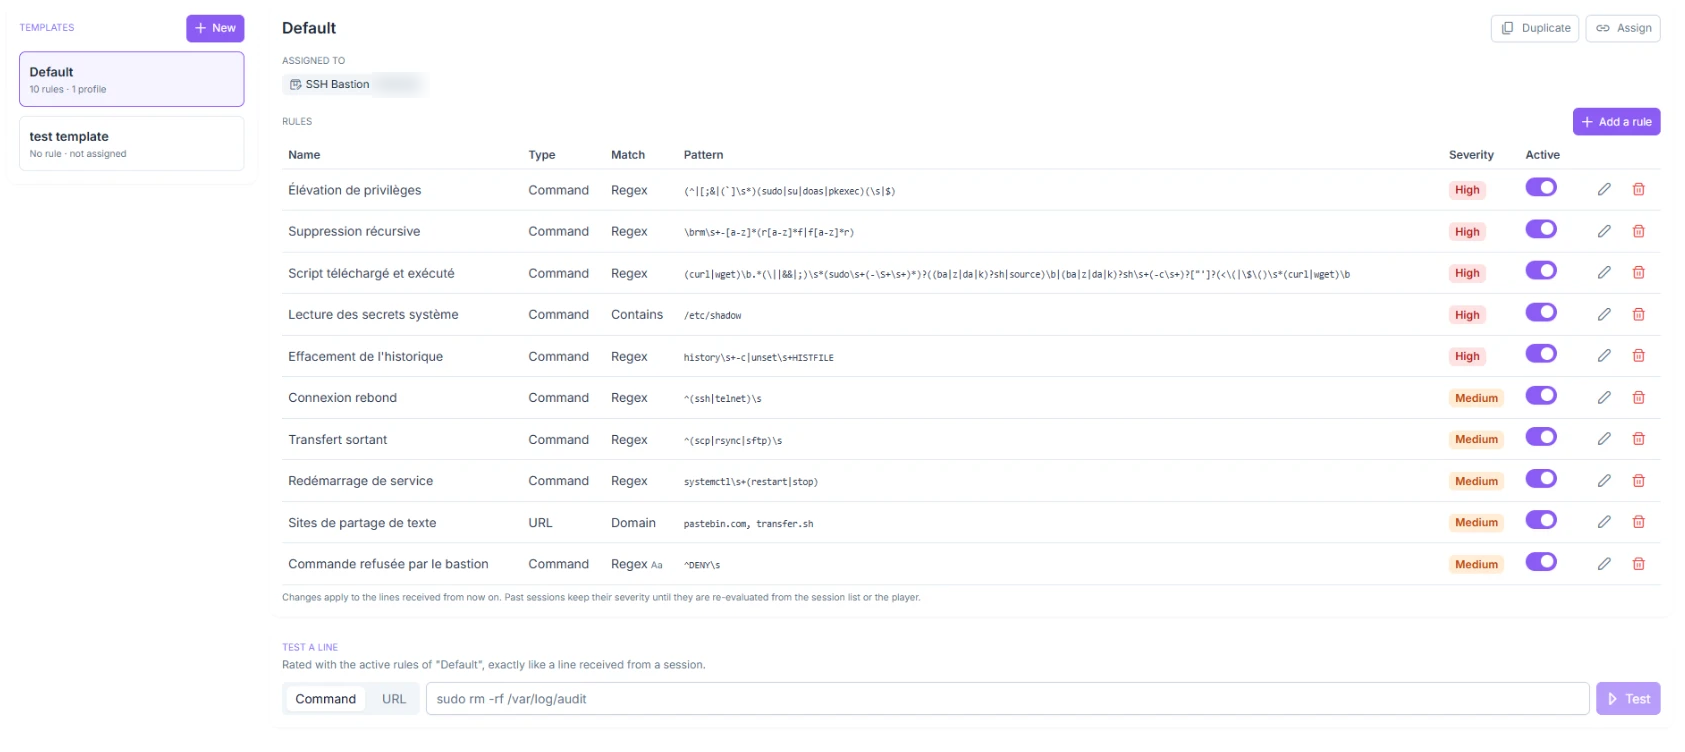
Sensitivity rules tab: templates on the left, rules of the selected template on the right.
Create and Assign a Template
Create a template for a type of user, then assign it to the container profiles or organizations concerned.
Warning
Add the rules of a template before you assign it, or start from a copy of Default: an empty template removes every alert for the users concerned.
To create the template:
In the Sensitivity rules tab, click + New.
Enter the name of the template.
Click Create.
To start from a copy, select a template (for example Default), click Duplicate, then Create: the copy keeps its rules. Then add the rules of the template: see Manage the Rules of a Template.
To assign it:
Select the template.
Click Assign.
Choose the container profiles and organizations that use it.
Click Save.
A container profile or an organization has only one template. If it already had another one, it moves to the new template: the window shows the current template of each profile (Currently: Default) and a message warns when items are “taken over from their current template”.
The change applies to the sessions that start from now on: a session in progress keeps its template. A template that is not assigned applies to no session, except Default, which is the fallback.
To rename a template, click Rename. To delete it, click Delete and confirm: the template and its rules are deleted, the container profiles go back to the template of their organization, and the organizations go back to the Default template. Past sessions keep their severity. The Default template can be duplicated, but neither renamed nor deleted.
Manage the Rules of a Template
Select a template in the list to show its rules, including those of Default.
To add a rule, click + Add a rule, fill in the fields (see Rule Fields), then click Create.
To turn a rule off without deleting it, use the toggle in the Active column. A rule that is turned off no longer triggers anything, and Test a line ignores it.
To edit or delete a rule, click the pencil or the trash icon of its row. Deleting requires confirmation.
Changes apply to the lines received from now on. Already-evaluated lines keep their severity until you re-evaluate: see Re-evaluate Past Sessions.
For example, to stop flagging sudo for a group of Linux administrators, duplicate Default, turn off the rule that detects sudo in the copy, then assign the copy to their container profile.
Test a Line
Check the effect of a template’s rules before a real session encounters them. In the Test a line block, choose Command or URL, enter a line, then click Test.
The result shows the Severity the line would get, the normalized line (Compared as), and the Triggered rules. The line is evaluated with the active rules of the selected template, exactly like a line received from a session. For example, sudo rm -rf /var/log/audit gets High severity, with the privilege escalation and recursive deletion rules.
The test applies to the selected template, not to the one a given container would receive: to see what a type of user receives, select its template.
Re-evaluate Past Sessions
Apply the template currently assigned to sessions that are already recorded, for example after fixing a rule.
Warning
Re-evaluation replaces the original severity of the re-evaluated lines, and the old severity cannot be recovered. Each re-evaluation is logged in the security logs.
In the video_library Sessions tab, set the period and the filters: re-evaluation applies to the sessions in the list.
Click Re-evaluate.
Confirm by clicking Re-evaluate.
The Re-evaluate button in the Global section of the player re-evaluates the open session only. After a re-evaluation, the alert counters are updated.
Rule Fields
Fill in these fields in the rule form. Before the comparison, the line is normalized: leading and trailing spaces are removed and repeated spaces are reduced to one. Case is ignored by default.
Name: the name of the rule, shown in the table and in the logs. Required.
Type: what the rule watches, Command (commands typed in the session) or URL (URLs requested by the session’s browser).
Match: how the line is compared. Contains and Regex are available for both types, Domain only for a URL.
Text, Pattern, or Domains: what the rule looks for. The label depends on the match.
With Contains, Text is the exact string looked for anywhere in the line, including inside a word.
With Regex, Pattern is a regular expression, in RE2 syntax, without backreferences or lookahead/lookbehind assertions. The
^character anchors the pattern at the start of the line.With Domain, Domains accepts one or more domains separated by commas. Their subdomains are included.
Case-sensitive: the comparison distinguishes uppercase from lowercase. Cleared by default. This field is not available with Domain.
Severity: High or Medium. High by default.
Active: the rule applies to the lines received from now on. Checked by default.
The form checks the regular expression: it shows “Valid regular expression” when it is correct. It rejects a pattern longer than 256 characters or an invalid expression: a message appears below the form and the rule is not saved.
Severities and Provided Rules
Choose the severity of a rule according to what it detects. The High and Medium severities count as alerts. A line that triggers no rule is classified as Info: it is counted as a command or a URL, without a marker. When several rules trigger on the same line, the line gets the highest severity and all triggered rules are listed.
High (red marker): destructive action, privilege escalation, or data leak. In Default: privilege escalation (
sudo,su,doas,pkexec), recursive deletion (rmwith the recursive and force options), script downloaded and then executed (curlorwget), reading of/etc/shadow, and history clearing.Medium (orange marker): sensitive but legitimate action. In Default: jump host connection (
ssh,telnet), outbound transfer (scp,rsync,sftp), service restart (systemctl restartorstop), text-sharing sites (pastebin.com,transfer.sh), and command refused by the bastion (line starting withDENY, case-sensitive).
The exact names and patterns of the provided rules appear in the table of the tab.
See also
Session Recording Player — Spot alerts on the playback bar and in the logs of a session.
See also
Sessions — Find a session and start a re-evaluation from the list.